Translate

Monday, November 28, 2011

A Different Thanksgiving

Our family held Thanksgiving this year without the patriarch of the family.  My beloved father-in-law passed away unexpectedly on November 7.  He lived to be 84, with all his faculties,  many family members by his side as he was wheeled into surgery.  He never regained consciousness.  Following the shock, and the funeral, is a new reality for my mother-in-law and all the siblings and families. We've pulled together, taken care of business, cried, and celebrated a life lived with greatest integrity.  It's been an incredibly difficult time but we are thankful for many blessings which did occur during this time.

So now, after Thanksgiving, I'm sewing again, working on our little blocks, considering the next step and whether I want to finish it next month, or keep going....your comments will be most welcome.  My first thought is I love making the blocks and I have plenty of Layer Cake fabric to keep it going.  My second thought is that I could use the rest of the fabric in the setting.  What would your choice be???

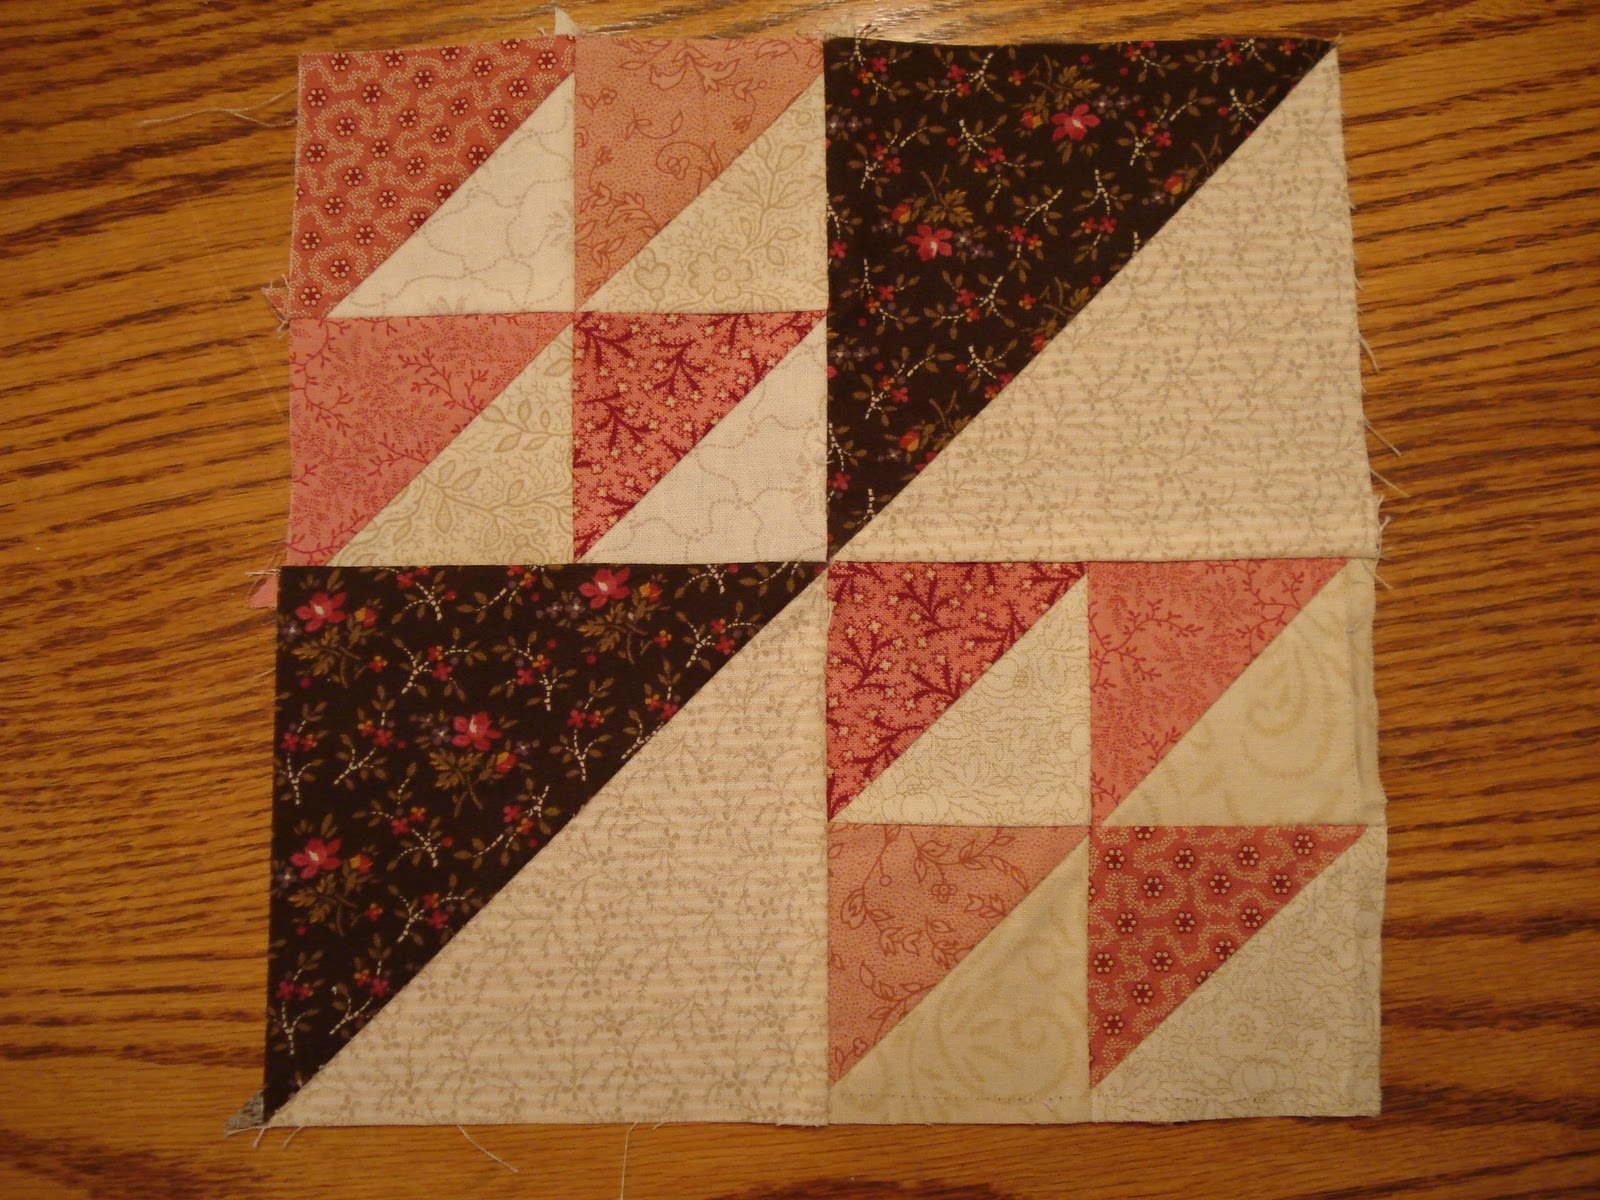
Here is the November block: 8" finished Maple Leaf

Pink and Brown Test Block
This is not normally an 8" block but, it does work and the numbers aren't bad.  I started with oversized pieces for the triangles (4" squares) so I could trim them down. 


For one block cut:
(1) Background piece for stem 3 1/2" square-cut in half on the diagonal. 
(1) Stem -rectangle 1" x 5"
(2) Dark and (2) Background squares 3 1/2" -cut in half on the diagonal
(3) Dark and (1) Background square 3 1/8" (cut a "generous" 1/8")
Assembly:

Piece the stem section first: Sew one triangle on and press toward the stem.  Align the second triangle, sew, and press toward the stem.  Trim to a "generous" 3 1/8". 
Try pressing your seams open throughout and see if you like it better.  I did this for the second block and I think it lays flatter and nicer.


Piece the triangle units and then sew the squares into three rows.  Sew the rows together to make the finished block. 
Layer Cake Block
So, although the leaves are off the trees and the wind is beginning to blow colder, you will have this maple leaf block to remind you of the fall season. 


Happy sewing!

Thursday, November 3, 2011

Guild Show and October Blocks

Did any of you locals have the chance to see the guild's quilt show this past weekend held in Westfield, Indiana?  I think it came off quite well.  I say it that way because I was on the show committee this time.  Although many people worked on it for two years my part of it required the most hours over the past seven weeks.  I'm guessing I put in about 75 hours in that time although I didn't keep track. I'm glad I did it but, it did put me behind on several projects such as the Block of the Month I've been doing for all of you.  Nevertheless, I am so glad to have met and gotten to know several more members of the guild by working on the show committee.  I think it really helps someone to feel more a part of a large group like that when you get involved in one of the activities of the group.  And, the quilts by my fellow oh-so-talented guild members were a delight to see.  Bravo to all!

October's block is Chimney's and Cornerstones.  It's a block I've always wanted to make and with colder weather coming I started thinking about cozy fireside evenings especially those at my Dad's. 

Here is my test block in Pink and Brown. 

For this block you can use leftover pieces from your layer cake squares or choose new ones to cut up.  I used 8 different fabrics but it could be made with as little as four fabrics. 

I started by selecting the two fabrics that create the X but, I'm not sure that is the easiest way to do it :).  Then I considered what I wanted to do with rectangle units.  I chose to repeat the fabrics on opposite sides of center going from lightest to darker (although none are "darks").  The tricky thing about choosing fabrics for this block is to make sure that even the darkest of the rectangles still has adequate contrast with X fabrics.  I probably made it more difficult by choosing a pink for one of these as the rest of the pinks had to be quite light in order for it to work.  But, I really like the way it came out so, I did my Layer Cake block the same way.  Here it is:

Layer Cake Block
There are many possible variations such as creating concentric squares or making each quadrant a different color or creating a log cabin effect instead of courthouse steps as this one is.  Use the cutting instructions below and lay out the pieces so you can make adjustments for the color scheme you select. 

Here are the full cutting instructions:

From X fabrics:
Cut (8) 1 1/2" squares of two feature fabrics. They do not have to be light and dark.  They can be any two fabrics which will contrast with the rest of your block pieces.

For next round cut (4) 1 1/2" x 2 1/2" rectangles.  (Two of each fabric if you're using my coloration.)
For the second round cut (4) 1 1/2" by 4 1/2" rectangles. (Two of each fabric if you're using my coloration.)
For the third round cut (4) 1 1/2" x 6 1/2" rectangles.   (Two of each fabric if you're using my coloration.)

To assemble:
1.  Sew together the four patch in the middle.
2.  Add a small pink print rectangle to two opposing sides of the four patch.
3.  Add the X squares to each end of the small beige rectangles.  Add this unit to the top and bottom of the four patch unit.
4.  Continue each round by adding the (pink) rectangles to the sides and adding the X squares to each end of the logs for the top and bottom before sewing the beige rectangles on to the unit.  Block should measure 8 1/2" square when complete. 

Thanks for hanging in there!  Hope you have some time to sew today.


Saturday, September 17, 2011

September Blocks


I had Another day to play Catch-Up (Thursday), now it’s Saturday….

After taking care of a few errands on Thursday I had a break in the action to work on this post.  I didn't finish it then but after a busy couple of days I can post it for you now.  I hope you have time to look at it over the weekend.  The weather has turned a little cooler and it feels lovely to be outside even if I’m just doing errands.  I’ve got my schedule under better control since last month.   I did finish the Railroad Crossing quilt as well as my other class samples and a couple of customer’s quilts too.  I've also had time to start another quilt top.

I made three blocks for you this month… twice.  One batch in pink and brown and, one from my layer cake squares.  I’ve got lots of 10" squares left and as I’m thinking about setting them I have one idea for using just 12 blocks to make a wall/throw size quilt which will finish at about 62” x 62” but I wanted to offer another option with more blocks in case you want to make it a bit larger (and have less leftover fabric.)  So, this month you can choose which one you want to make or make all three.  Or, if there was one you especially liked in an earlier month you could always make another of one of those.  The second setting I offer will grow more easily to suit the number of blocks you make.

The first block was chosen as a nod to the changing of the seasons and it is called Flock of Geese.  The second one uses up some of smaller leftover bits that I can’t throw away.  And, the third is a tribute to my beloved New York called Yankee Puzzle.  Once a Yankee, always a Yankee; September no longer goes quietly by without my thoughts returning “home”.  

Flock of Geese:

Version 1: Two Fabrics

From both a Light and a Dark 10” fabric square:  Cut  (1)  4 7/8” square, and cut (4) 2 7/8” squares.  (Note:  For the smaller triangles you could also use an easy angle tool.  In that case, cut (2) strips 2 ½” x 10”, layer dark and light strips RST in one stack and cut 8 pairs of triangles with 4 cuts.)

Pair the large squares right sides together and draw a line diagonally on the back of the light square.  Sew ¼” on both sides of the diagonal and cut apart on the drawn line.  Yield 2 HST units.   Press the seam open.  Square up, if necessary, to 4 ½”.   Repeat using the sets of the smaller squares.  Square these up to 2 ½”.  Lay out the block as shown in the photo at right.  Sew smaller units in groups of two then sew twos into fours.  Keep the units all facing in the same direction-light sides facing one way, dark facing the other.  Pressing the seams open will help the block lay flatter especially in the center.

Version 2:  Scrappy

Cut (1) dark and (1) light square 4 7/8”.  Choose 4 different lights and 4 different mediums (pinks) and cut (1) 2 7/8” square from each.  (Stack ‘em and cut them all out at the same time.)  You should have lots of pieces left from previous blocks.  Using them will help tie all the blocks together!  Use the instructions above to assemble the block.


Crossroads:

From one or more Dark fabrics cut a total of (4) 2 7/8” squares.  From one or more Medium fabrics cut a total of (8) 1 ½” x 2 ½” rectangles.  From one or more Light fabrics cut a total of (8)  1 ½” x 2 ½” rectangles AND, (4) 2 7/8” squares.  Lay the pieces out as shown in the photo at right.  Using the squares and the same method as in the Flock of Geese block for making Half-Square Triangle units, layer, mark and sew on both sides of the diagonal to make 8 HST units.  Sew rectangles together into groups of 4 by sewing them together along the long edge.  Sew the center of the block together.  Add a group of rectangles to the sides.  Add a HST unit to the end of each of the remaining rectangle units.  Sew these new units to the top and bottom of the center unit to complete the block. 


For a scrappier effect choose a wider variety of fabrics for the rectangles and further mix placement of lights and mediums.  This pink and brown version really isn't much scrappier than the blue and brown block above.


Yankee Puzzle:

From one light fabric (center pinwheel):  Cut (2) 2 7/8” squares.  From another light cut (6) 2 7/8” squares (or 2 2 ½” strips using an easy angle tool).

From Medium fabric:  Cut (2) 2 7/8” squares (or 4 triangles from a 2 ½” strip using an easy angle tool).

From Dark fabric:  Cut (1) 5 ¼” square, cut in half on both diagonals and (2) 2 7/8” squares (or, 4 triangles from a 2 ½” strip using an easy angle tool).

Using 8 matching light triangles sew onto both short edges of each of the 4 large dark triangles making four flying geese units.  Using smaller dark triangles, sew together with 4 matching light triangles to make 4 HST units.  Sew Medium triangles together with remaining light triangles.  Lay out block according to photo at right.  Sew a pair of triangle units onto the bottom of each flying geese unit to make 4 block sections.  Sew 2 sections together to make each half of the block.  Sew the halves together to complete the block.
My two blocks aren't much different from each other.  The top one is from my layer cake squares, the bottom one is from my stash.

Note:   I use an easy angle tool much of the time especially with 10” squares.  I feel like I get better usage out of my squares.  From (1) 10” square I can cut (2) 2 ½” strips and (2) 5” squares.  With those units I can cut almost every piece for these blocks, both triangles and squares.  However, I did not pre-cut my squares into these units. 

I hope you will enjoy making one or more of these blocks!  Enjoy the season!